Remote Shepherd Developer's Blog
About
Pages
Sunday, June 5, 2011
Wednesday, May 11, 2011
Dave McKean Should Be Flattered, Right? Right?
Thursday, April 21, 2011
Havok, Vertex Buffers, Maya 2011
So, it's been a while since I posted. We ran into an interesting situation where we learned that Havok was exporting our referenced meshes as unique meshes within our level. This led to each mesh having its own unique vertex and index buffers. Now, with trees, paths, POIs, and other content, this led up to having 5600 unique vertex and index buffers.
That, for lack of any better words, is a lot of content. That's also a lot of state changes between graphics calls. So, how did we fix this?
Well, we first attempted to export our files using the Havok exporter in Maya 2011, using the "Find Mesh Instances" filter. This filter is supposed to remove duplicate meshes from the scene, but does not detail how it does so.
We at first assumed that any file that was referenced in would be considered a duplicate mesh. Then, when that didn't work, and we had a 50 MB level, we tried doing reference copies. That didn't work either. Well, I then systematically attempted to figure out how "Find Mesh Instances" worked. Turns out, I couldn't find a way for it to work (at least not using the filter).
But, after talking with Eric, I found a nice way around this.
So, the solution was instead to do this:
- Reference in the object / model you want to use from the file of your choice.
- After placing your reference, select the object in the Viewer or Outliner.
- Go to Edit->Duplicate Special (click the square next to it to set it up)
- Select Geometry Type as Instance and Group Under as World.
- Click Duplicate Special.
What this does is creates an instance of the reference that was loaded, which has its own transforms separate of its parent. However, because it is an instance of the reference, its materials, vertex data, etc will be changed when the reference is updated. Likewise, when you execute the shortcut now, these parameters will already be set up.
When you export using the Havok Content Tools exporter for Maya 2011, "Find Mesh Instances" will report not finding any duplicate meshes. However, only a single instance of the mesh will be loaded and referenced in the scene. For us, this insures we only create one index and vertex buffer per referenced mesh, greatly reducing the size of our level files and increasing run-time performance for the game.
Saturday, April 16, 2011
Heatmaps!
Tuesday, April 12, 2011
Animation State Engine and Expressive AI

Now that we have some animations the AI can start to look more interesting. No longer do they merely stop at the goal and wait to move to the next goal; they actually do something at their goal now! To further that end I developed an animation state engine. This is basically a finite state engine with each state representing an animation, and the edges representing transitional animations. It allows the AI and animation systems to be separate, and the AI system to merely tell the animation system which animation state it should be in next, and the ASE will handle picking the appropriate transitional animation and determining when to play and when to stop animations. Each agent also has a map of animation categories to specific animations, meaning different agents can easily have different "Walk" or "Idle" animations without the ASE or the AI system caring at all.
This Is Why We Can't Have Nice Things, Delta

Two Paths Diverged in the Park (With Apologies to Robert Frost)
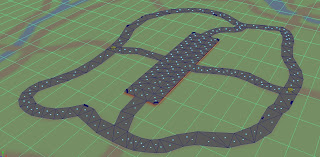
 Right now it's only the actual dirt/concrete/DG/whatever paths in the park, it doesn't include grassy areas yet. There are plans in the future to mesherize the grassy areas as well, but we need some way to assign terrain modifiers to polygons so that AI knows what kind of terrain it is walking on. The other thing you will notice about the nav mesh is that it is all triangles, instead of n-gons. This is unfortunately a shortcoming of Havok, it refuses to read anything but triangles. This means more polygons than strictly necessary, and also it means that our centroids kind of make a wobbly line. That being said, it works pretty well, and the local avoidance gets the AI to alter it's path and keeps them from looking like they are in one big line.
Tuesday, March 29, 2011
Scout Mode
 |
| Scout HUD |
Making Comic Book UIs
- A must read for comics would be Understanding Comics by Scott McCloud.
- A great reference for lettering traditions is Comic Book Grammar and Tradition.
- A very helpful adobe illustrator tutorial for comic book lettering by Jim Campbell, https://files.me.com/jim.campbell/qqt5ck.
Sniper Map
 |
| The Strangers |
Saturday, March 26, 2011
Game Modes / HUDs
 |
| Shooter Mode |
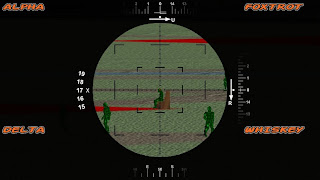
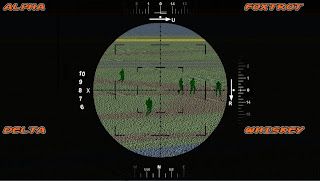
The new game mode is Scout where the player uses a directional mic attached to a high power camera. The player will use the mic as another method of locating their target and the camera to gather evidence for non-lethal conclusions. In this mode dialogue picked up by the mic is displayed in radio bubbles around in the blacked area of the HUD. Due to how the dialogue is displayed, we removed everything but the compass form the Shooter mode HUD.
 |
| Scout Mode |
Repurpose Not Rebuild
Building a Terrain
After experimenting with all the other solutions I had found, I settled on Nem's Mega 3D Terrain Generator for several reasons. The most important was that it allowed the level designer to quickly generate a terrain using some built-in generation techniques and hand-sculpting tools. This program also allows us to export our terrain as an .OBJ files that we can then import into our Maya scenes, a feature I felt was important to have. The designer also has control of the size and number of triangles of the terrain, which is important for us to make sure we keep our poly count down. Lastly with Nem's Terrain Generator the designer can hand paint each face with a texture which is nicer than Maya's process for applying a face with a particular texture.
 |
| Nem's Mega 3D Terrain Generator |


